
You guys want to mod some Rust? Yea me too! In this tutorial I will show you how to use the Oxide API to create a basic Rust plugin and upload it to your rust server. I will not be showing you how to setup a server but maybe with some requests I'll do that in another post. I wrote this plugin in C# using Visual Studio 2015. Oxide does support other language options like lua.
Some things you will need:
- Visual Studio 2015 - The community edition is free. Technically you don't NEED it...a text editor will get you by but seriously recommend using an IDE instead.
- An FTP Client - I'll be using FileZilla.
- RustAdmin - Not required but it's nice way to get feedback from the server if you have log messages or errors.
At a high level, all we need to do is write a plugin, which is simply a .cs file, and upload it to the server. If you're a text editor user all you really need to concern yourself with is uploading the code file you create. VS2015 users might want to pull the git repo repository for Oxide which you can find at: https://github.com/OxideMod/Oxide so you can take advantage of other peoples hard work to give you intellisenseand code suggestions. Thanks Oxide team!
After pulling/downloading the code from git and opening the visual studio solution - navigate to the Rust plugins folder in the Solution Explorer. Here you will right click the Plugins folder and Add > New Item. Select the C# class option and give your file a name.


I'm calling my plugin "Lottery" (filename LotteryPlugin.cs). After a certain amount of time players will be prompted to play the lottery. They will guess a number between 1 and 10. If they guess correctly they will win a Supply Signal . If they guess incorrectly they will not be able to guess again until the next lottery and be awarded a Rock. The lottery will also have a length/duration, if no one guesses correctly in that timeframe the lottery will end and players will wait until the next lottery to play again.
Let's write some code!
First, our class needs to inherit from RustPlugin and be in the Oxide.Plugins namespace. Be sure to include the Info and Description attributes for your plugin. These attributes include the plugin name, author name, plugin version, and description.
using Oxide.Core.Libraries.Covalence;
using System;
using System.Collections.Generic;
using System.Linq;
using System.Text;
using UnityEngine;
namespace Oxide.Plugins
{
[Info("Lottery", "Adam Massingale", 0.1)]
[Description("Plugin that gives a player signal flare when they guess the right number")]
public class LotteryPlugin : RustPlugin
{
...
}
}
Next, there are some things worth noting. Oxide supports timers, I opted to use my own because they weren't quite what I needed. Next there are two server hooks and one attribute I use that are worth noting, Init(), OnTick(), and ChatCommand respectively.
Init is a hook that is called when the plugin is initialized. I'm using it for some initialization.
void Init()
{
nextLotteryTime = Time.time + lotteryRate;
guessedPlayerIds = new List<ulong>();
}
OnTick is simply an update function called every tick. I'm using it to run my timer logic.
void OnTick()
{
if(!isLotteryRunning && nextLotteryTime < Time.time)
{
StartLottery();
}
if(isLotteryRunning && lotteryEndTime < Time.time)
{
LotteryExpired();
}
}
ChatCommand is the attribute I'm using on my function to callback when the client types /lottery in the chat window. As you can see this also passes args which are parameters of the command.
[ChatCommand("lottery")]
void LotteryCommand(BasePlayer player, string command, string[] args)
{
...
}
You'll also see in the code I'm using a few more API calls I'll quickly explain these.
PrintToChat sends a server chat message to the server.
PrintToChat("Lottery Time! Guess a number between 1 and 10 (example: /lottery 10");
Player.ChatMessage sends a chat message to that instance of the player it's called on.
player.ChatMessage("Invalid guess. Try something like /lottery 10");
ItemManager.CreateByItemID passes in an item definition which I'm resolving with ItemManager.FindItemDefinition which passes in a string id for the item (i.e. supply.signal).
Item item = ItemManager.CreateByItemID(ItemManager.FindItemDefinition(gift).itemid);
That's about it for the important parts of the code. The rest of the code is a bit of simple logic for the lottery. Here is the script in it's entirety.
using Oxide.Core.Libraries.Covalence;
using System;
using System.Collections.Generic;
using System.Linq;
using System.Text;
using UnityEngine;
namespace Oxide.Plugins
{
[Info("Lottery", "Adam Massingale", 0.1)]
[Description("Plugin that gives a player signal flare when they guess the right number")]
public class LotteryPlugin : RustPlugin
{
const float lotteryRate = 25f; //in seconds
const float lotteryLength = 25f;
float lotteryEndTime;
float nextLotteryTime;
int winningNumber = -1;
bool isLotteryRunning;
List<ulong> guessedPlayerIds; //list of playerids that have guessed
//Called when a plugin is being initialized
void Init()
{
nextLotteryTime = Time.time + lotteryRate;
guessedPlayerIds = new List<ulong>();
}
void OnTick()
{
if(!isLotteryRunning && nextLotteryTime < Time.time)
{
StartLottery();
}
if(isLotteryRunning && lotteryEndTime < Time.time)
{
LotteryExpired();
}
}
void LotteryExpired()
{
PrintToChat("The lottery has expired. There were no winners. Better luck next time.");
isLotteryRunning = false;
nextLotteryTime = Time.time + lotteryRate;
guessedPlayerIds.Clear();
}
void StartLottery()
{
isLotteryRunning = true;
lotteryEndTime = Time.time + lotteryLength;
winningNumber = UnityEngine.Random.Range(1, 11);
PrintToChat("Lottery Time! Guess a number between 1 and 10 (example: /lottery 10");
}
[ChatCommand("lottery")]
void LotteryCommand(BasePlayer player, string command, string[] args)
{
if (!isLotteryRunning)
{
float delta = nextLotteryTime - Time.time;
player.ChatMessage("The lottery has not started yet! Next lottery in " + delta + " seconds.");
return;
}
if(guessedPlayerIds.Contains(player.userID))
{
float delta = nextLotteryTime - Time.time;
player.ChatMessage("You've already played! Try again at the next lottery in " + delta + " seconds.");
return;
}
if(args.Length != 1)
{
player.ChatMessage("Invalid guess. Try something like /lottery 10");
return;
}
int guessedNumber;
bool isNumeric = int.TryParse(args[0], out guessedNumber);
if(!isNumeric)
{
player.ChatMessage("Your guess isn't a number! Try something like /lottery 10");
return;
}
//WINNER
if(isLotteryRunning && guessedNumber == winningNumber)
{
PrintToChat(player.displayName + " has won the lottery!");
GivePlayerGift(player, "supply.signal");
isLotteryRunning = false;
nextLotteryTime = Time.time + lotteryRate;
guessedPlayerIds.Clear();
}
//LOSER
else
{
player.ChatMessage("You didn't win this time...Keep Playing!");
GivePlayerGift(player, "rock");
guessedPlayerIds.Add(player.userID);
}
}
void GivePlayerGift(BasePlayer player, string gift)
{
Item item = ItemManager.CreateByItemID(ItemManager.FindItemDefinition(gift).itemid);
player.GiveItem(item);
}
}
}
Now that we have our plugin written we just need to upload it to our server and we're done! You'll need the FTP information to use FileZilla to upload it to the server. If you use a decent hosting service this info should be provided to you. After you Quickconnect with these credentials via FileZilla you should see your servers file structure under the Remote site pane. Navigate to server>oxide>plugins. This is where you an drag and drop your plugin in the pane below. See the image below for clarification.
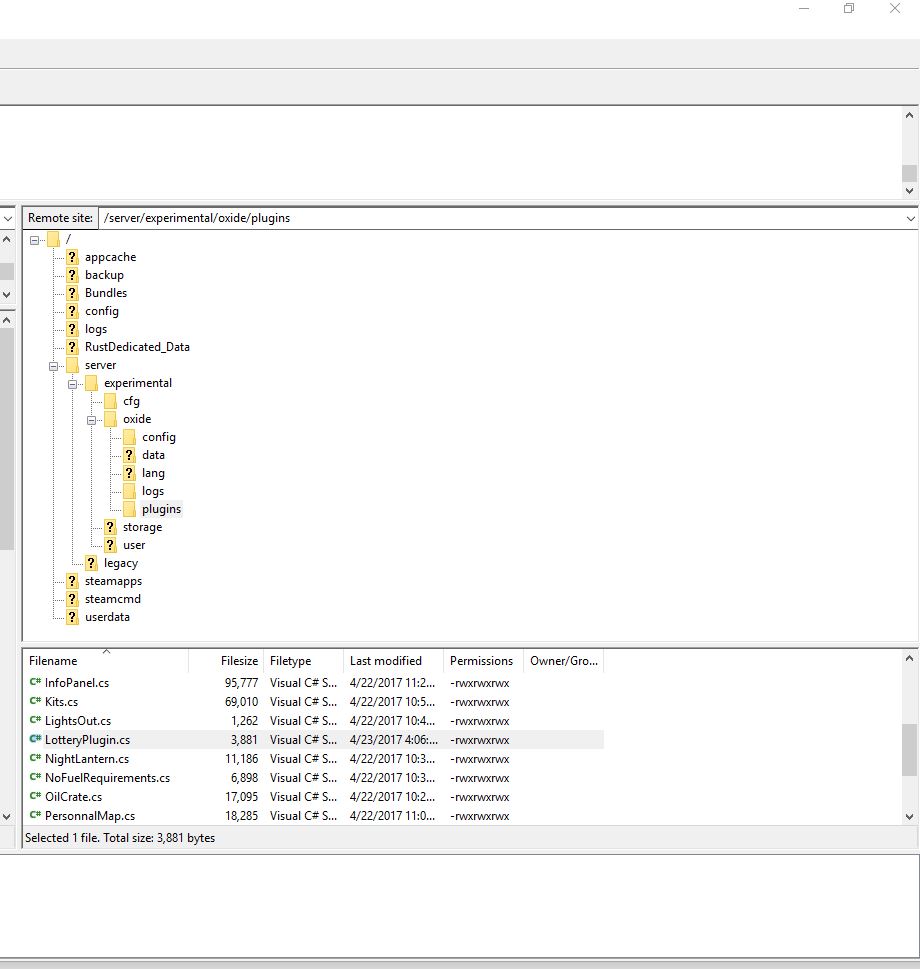
As you can see I'm trying out several other plugins that can be found on Oxides site. After you've uploaded your plugin. It will immediately be available in game. This plugin does not require a server restart...but there are likely some that do.
A quick piece of advice on debugging issues. RustAdmin is a tool that I use to identify issues in uploading my plugins. So if you're catching null reference exceptions etc it's great to get some insight on to what's going on.
Thanks for reading! Please post any questions in the comments and/or share if you liked this post!


